Layer 2 (point-to-point) – general help
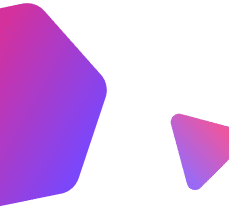
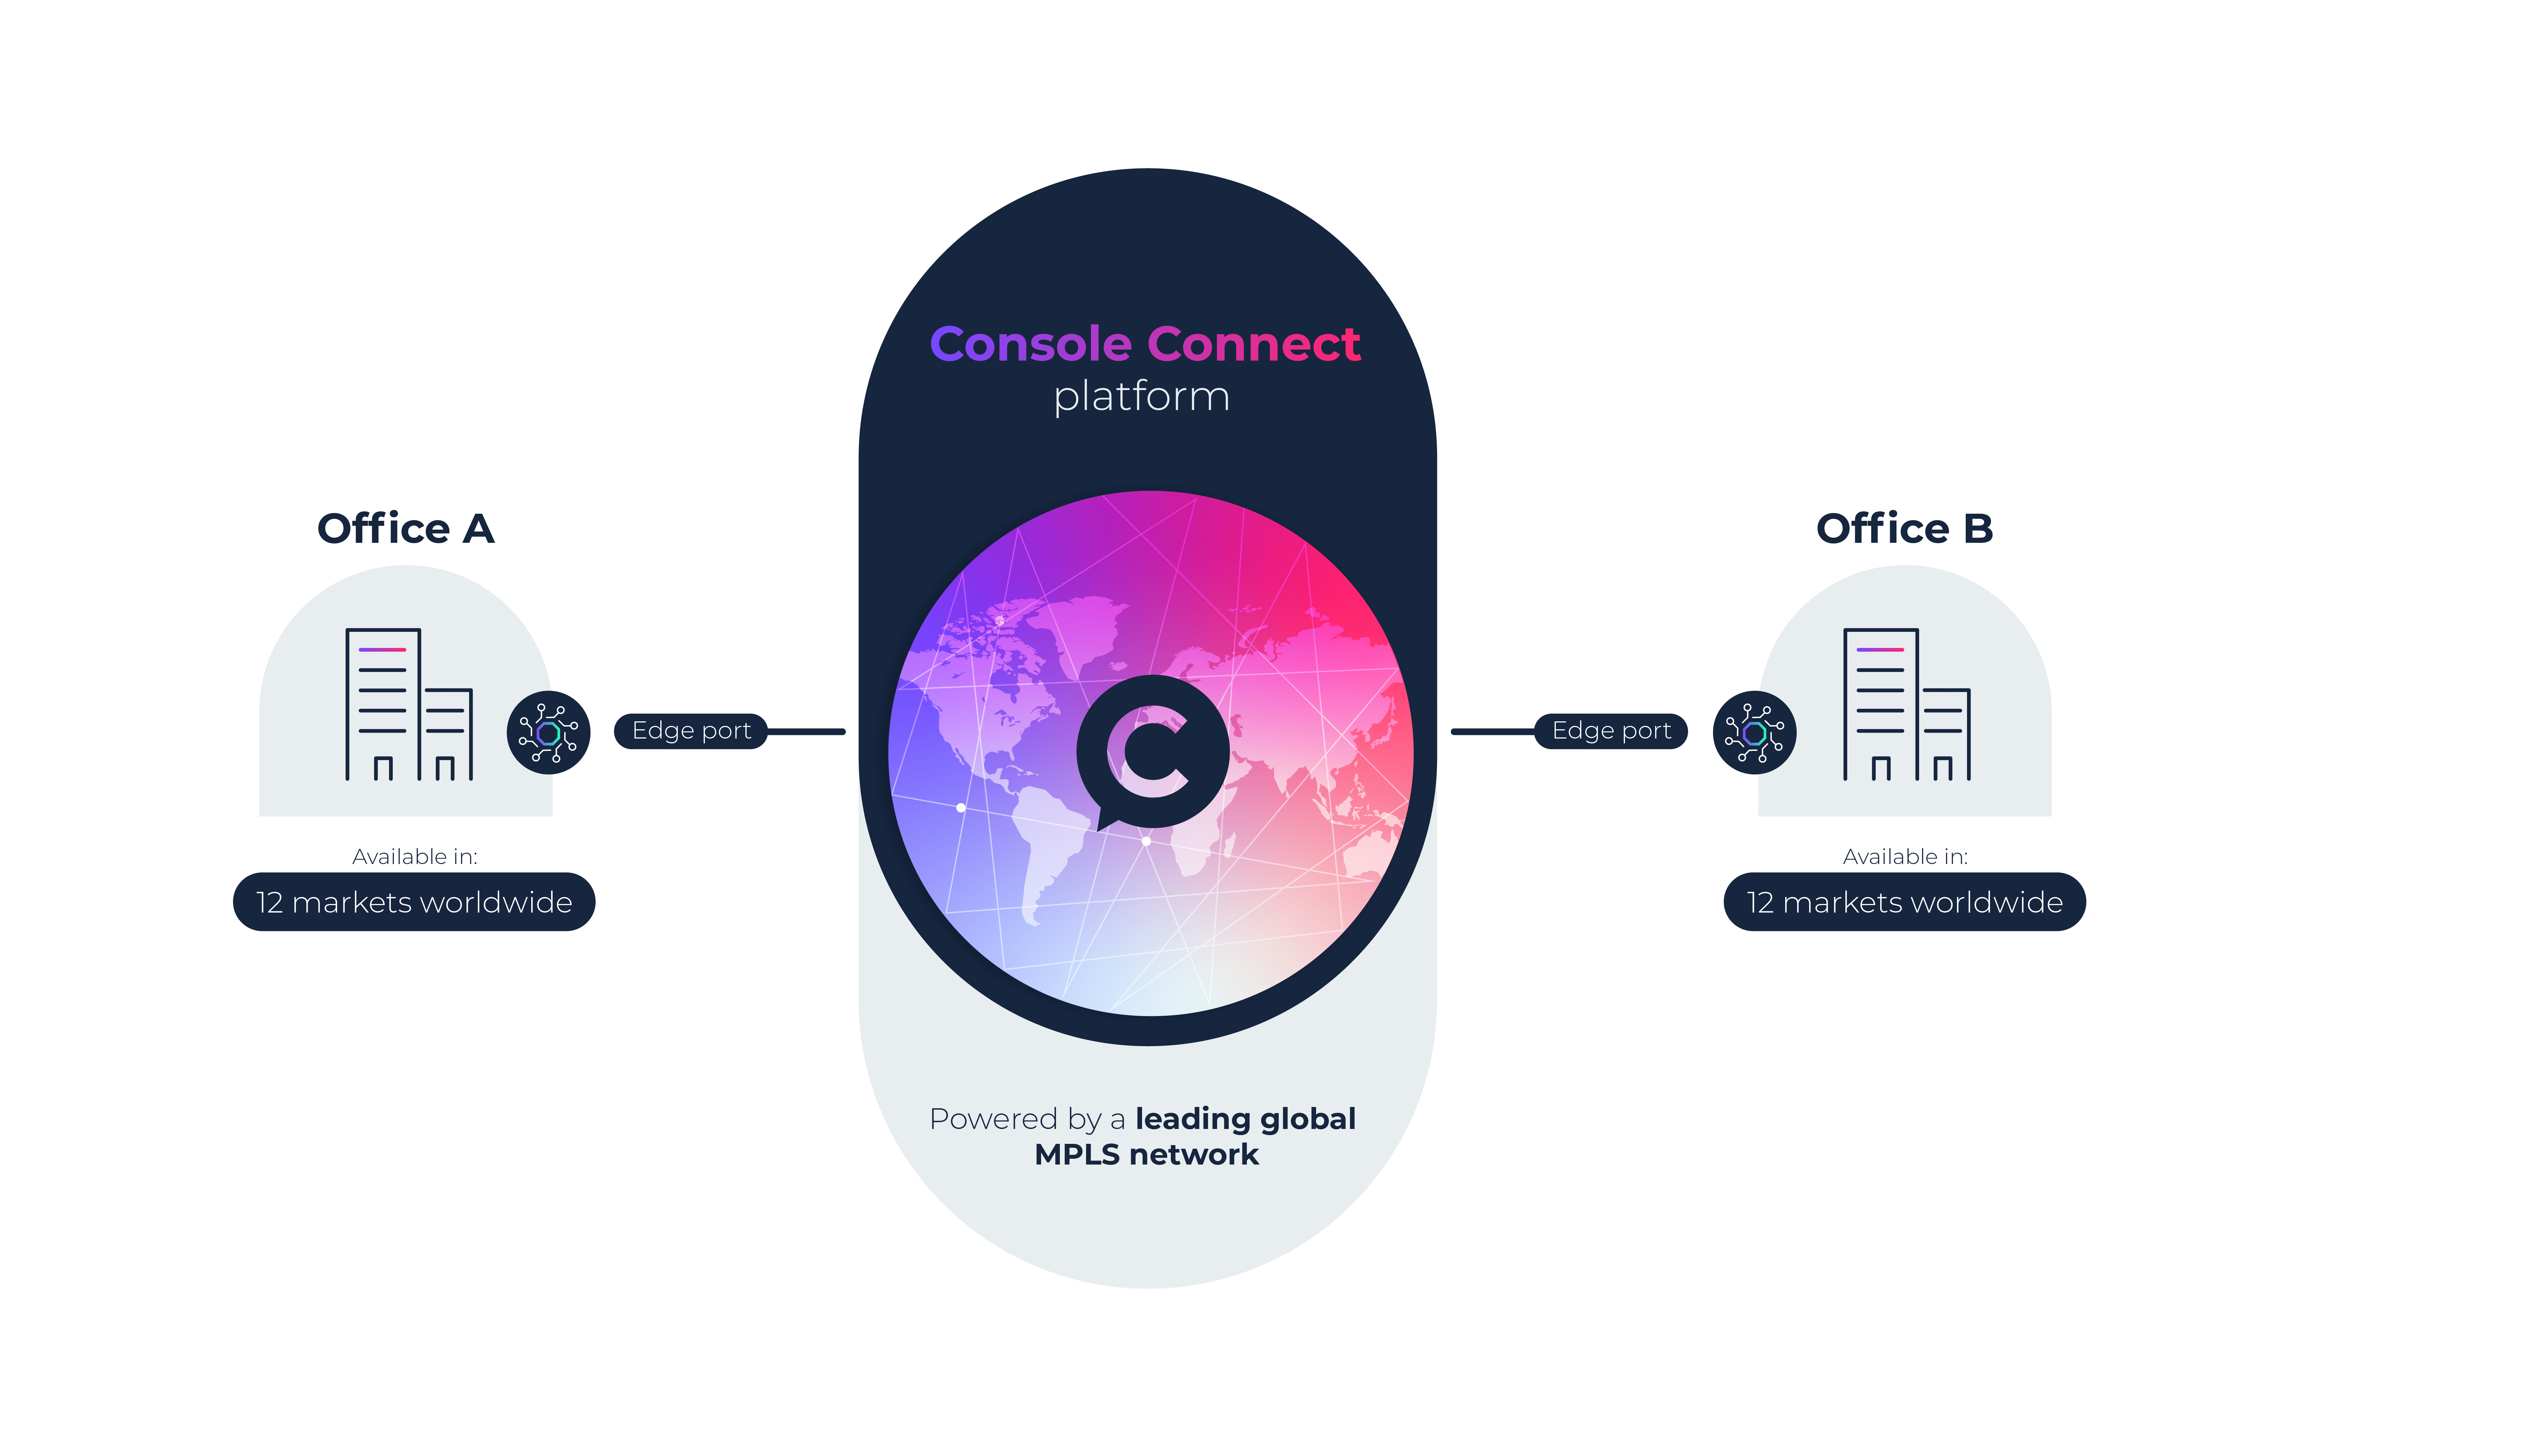
A Layer 2 (point-to-point) connection provides a dedicated, private link between two locations. It is the most direct and secure way to connect destinations across your network.
With Console Connect’s Network-as-a-Service (NaaS) platform, you can easily create these private connections within minutes – linking your enterprise sites, data centres, clouds, applications, or other users on the platform.
Connect locally, regionally, or globally over our own high-performance Layer 2 network and enjoy the reliability and security of a private, end-to-end connection that completely bypasses the public internet.
Creating a Layer 2 (point-to-point) connection
Before you can begin creating a connection, you must have an Access Port.
How to provision a Layer 2 (point-to-point) connection
- Select the Dashboard menu > click Add new service button > select Layer 2 (point-to-point) > select Order.
- There are currently four types of Layer 2 connections that can be provisioned via the platform. From your port to:
- Port – allows you to select another port you already own.
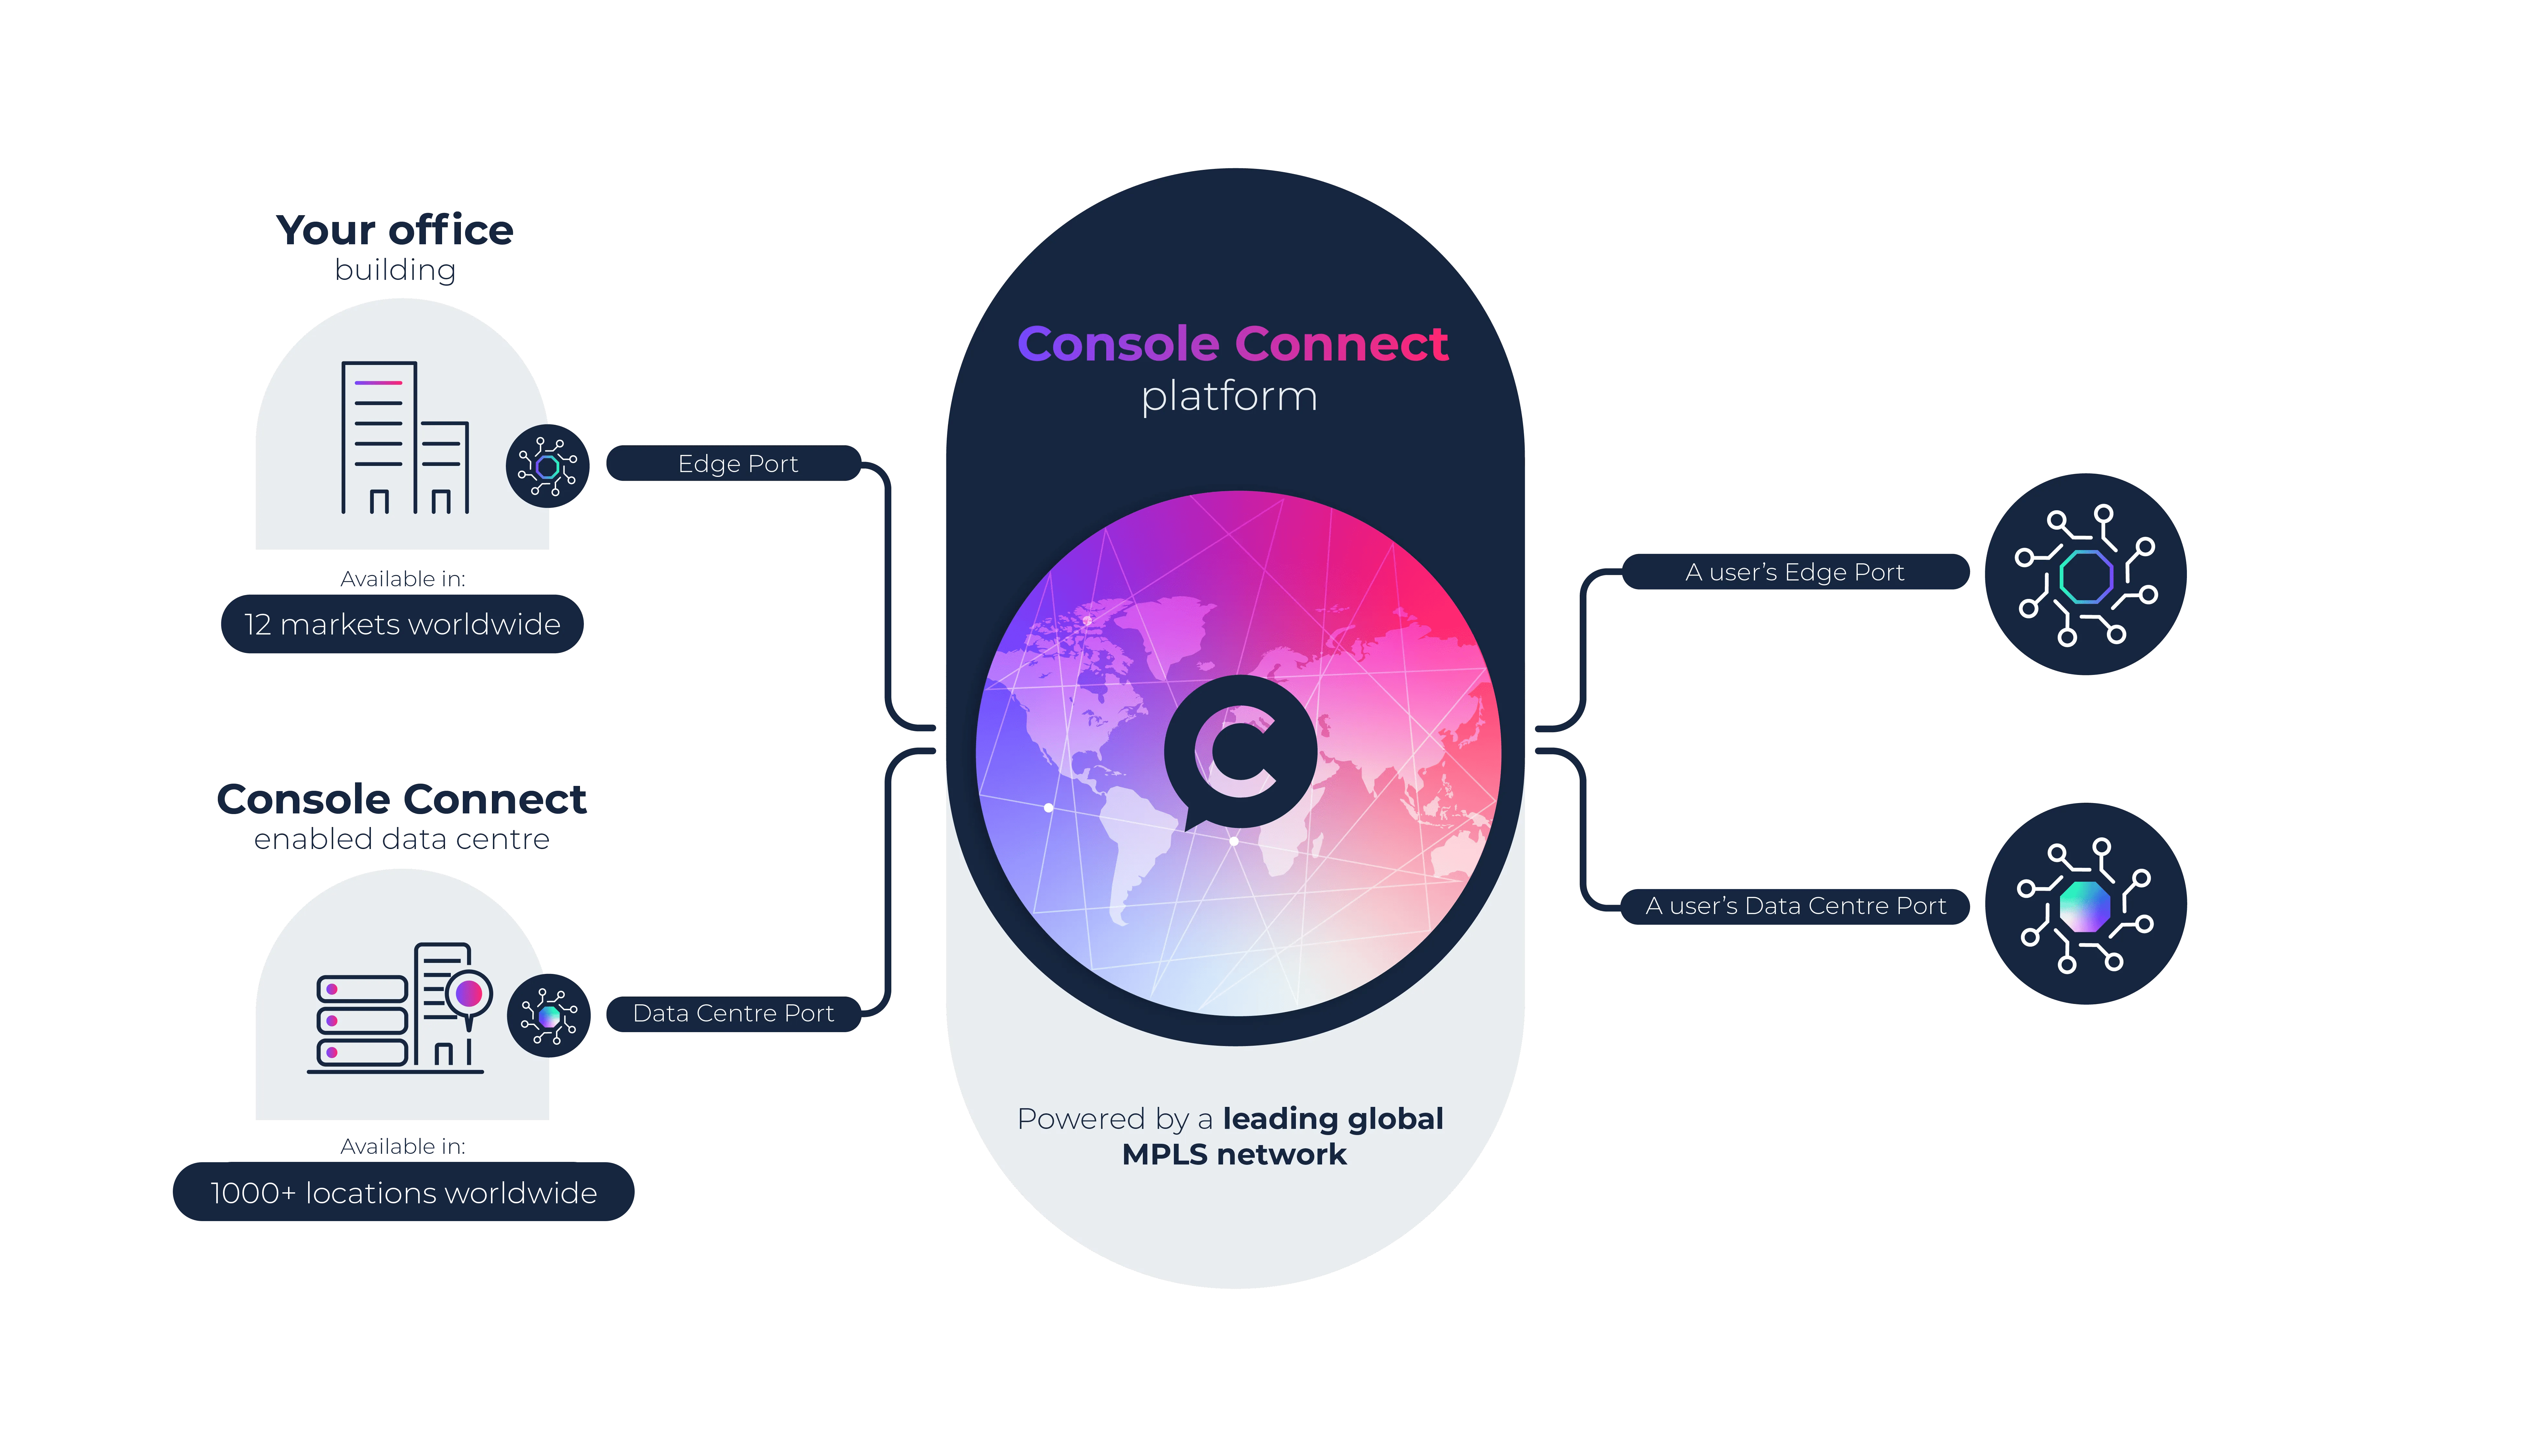
- Cloud – select from more than a dozen leading cloud providers.
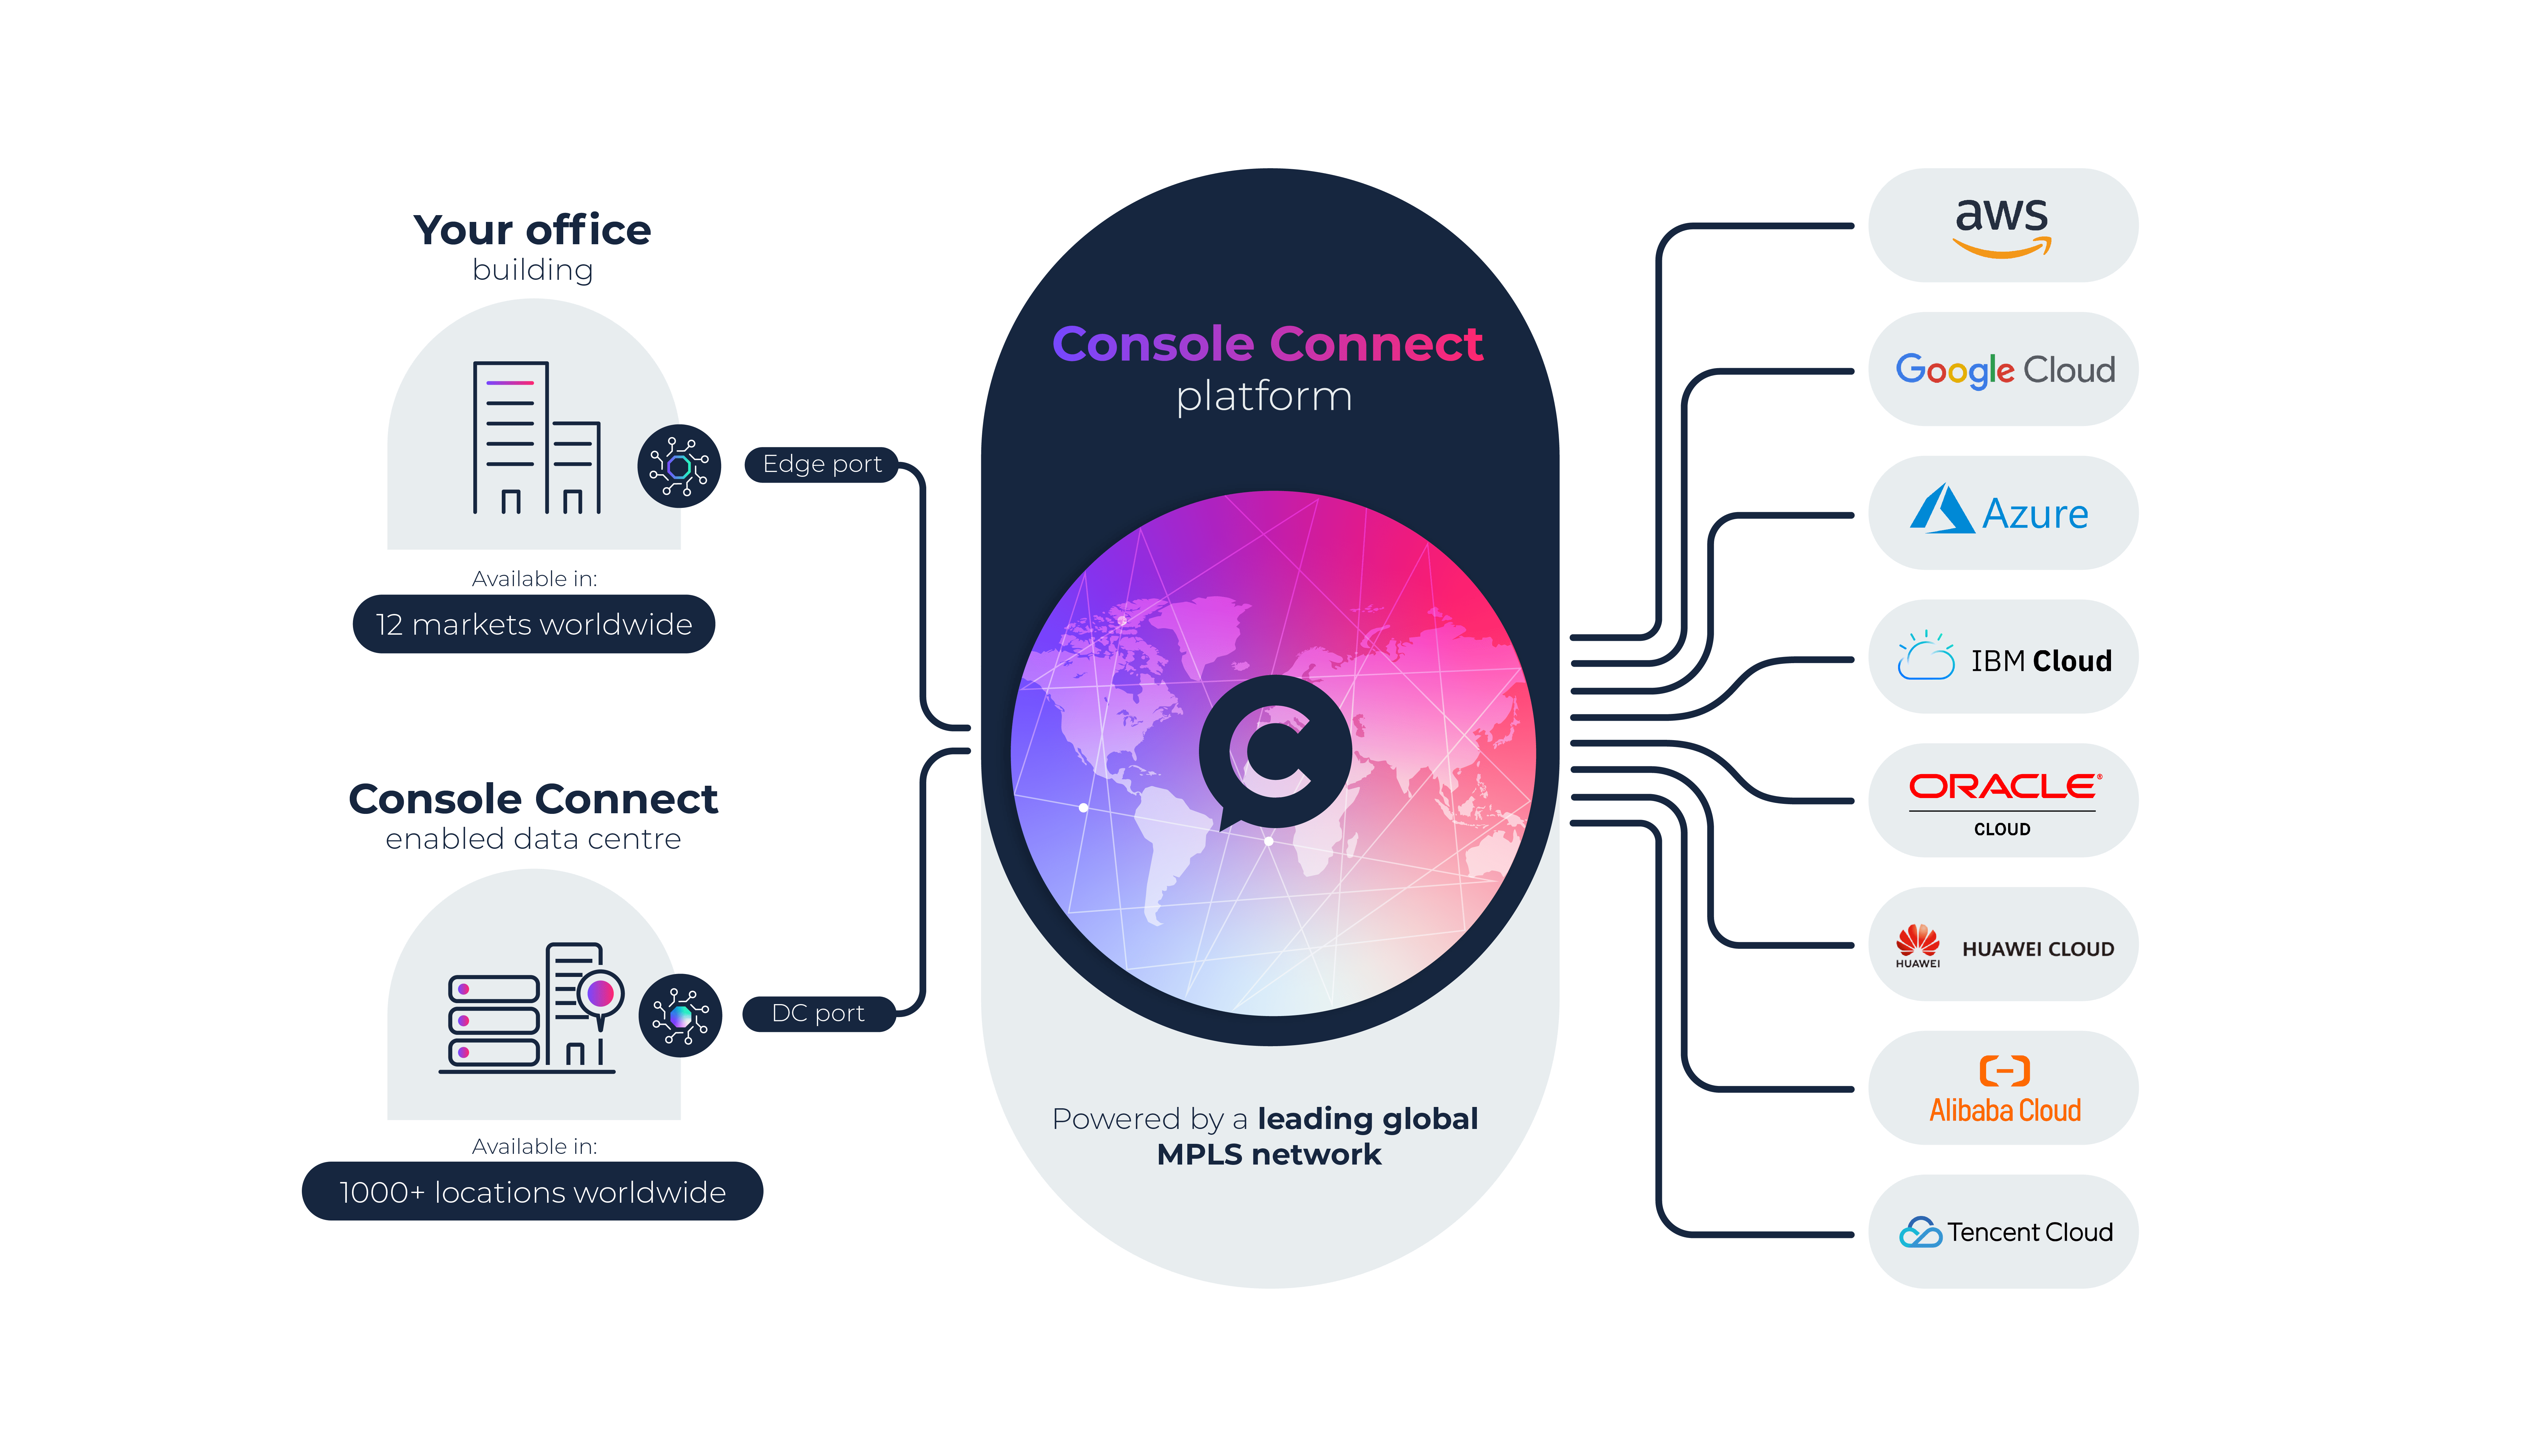
- IX – peer with the world’s leading internet exchanges.
- Enterprise – directly connect with other companies that are part of the Console Connect ecosystem.
Port to port connection
- Under Source click My port and select your preferred source port.
- Under Destination click My port and select your preferred destination port.
- Configure your connection:
- Connection name.
- Connection bandwidth – is limited only by the capacity of the source and destination ports you have selected.
- Source VLAN ID – by default Console Connect will assign you a VLAN ID, however, if you would prefer you can click the switch and allocate a specific available VLAN ID.
- Destination VLAN ID – by default Console Connect will assign you a VLAN ID, however, if you would prefer you can click the switch and allocate a specific available VLAN ID.
- Class of service – select your preferred class of service.
- Contract duration – select your preferred contract duration.
- Check the configuration and price of your connection and to confirm, click Checkout.
- To checkout, review your order details in the service summary card and then provide an:
- Order name – this is used to identify your order and will also become the name of your service.
- Optional Customer reference number – use this field for adding any additional information to the order that will help track it in your own systems.
- Agree to the Terms and conditions.
- Click Order.
Port to cloud connection
- Under Source click My port and select your preferred source port.
- Under Destination click Cloud and select your preferred destination cloud.
- Each cloud may require slightly different information. In most cases you will be asked to set:
- Your cloud Account ID.
- Select the Destination port – the location where you would like to connect to this cloud.
There are some clouds that require service keys and/or alternative information to configure a connection. See Google Cloud, Azure, OVHcloud for more details.
- Configure your connection:
- Connection name – this will be the name used to identify the connection in your cloud portal.
- Connection bandwidth – is limited by the capacity of the source port and cloud you have selected.
- Bandwidth tier – some clouds use bandwidth tiers for pricing. Changing the connection bandwidth may trigger changes in the bandwidth pricing from your cloud provider. The tooltip will give you an overview of your cloud’s bandwidth tiers.
- Source VLAN ID – by default Console Connect will assign you a VLAN ID, however, if you would prefer you can click the switch and allocate a specific available VLAN ID.
- Class of service – select your preferred class of service.
- Contract duration – select your preferred contract duration.
- Once you are happy with the configuration and price of your connection click Checkout.
- To checkout, review your order details in the service summary card and then provide an:
- Order name – this is used to identify your order and will also become the name of your service.
- Optional customer reference number – use this field for adding any additional information to the order that will help track it in your own systems.
- Agree to the terms and conditions.
- Click Order.
Port to IX connection
- Under Source click My port and select your preferred source port.
- Under Destination click IX and select your preferred IX. If the IX you would like to connect to doesn’t appear please contact support.
- Select the Destination port – the location where you would like to connect to this IX.
- Complete the IX customer application. Each IX will have a unique application for you to complete. If you require assistance please contact support.
- Configure your connection:
- Connection name.
- Connection bandwidth – is limited by the capacity of the source port and the IX you have selected.
- Source VLAN ID – by default Console Connect will assign you a VLAN ID, however, if you would prefer you can click the switch and allocate a specific available VLAN ID.
- Class of service – select your preferred class of service.
- Contract duration – select your preferred contract duration.
- Once you are happy with the configuration and price of your connection click Checkout.
- To checkout, review your order details in the service summary card and then provide an:
- Order name – this is used to identify your order and will also become the name of your service.
- Optional customer reference number – use this field for adding any additional information to the order that will help track it in your own systems.
- Agree to the terms and conditions.
- Click Order.
Port to enterprise connection
- Before you can begin a Layer 2 Port to enterprise connection order you must contact the company you wish to connect to and request a Service key.
- Under Source click My port and select your preferred source port.
- Under Destination click Enterprise.
- Enter the Service key you received from the company to which you are connecting. This service key will retrieve:
- Destination company name.
- Destination port location.
- Connection bandwidth.
- Configure your connection:
- Connection name.
- Connection bandwidth – is set by the company who created the service key.
- Source VLAN ID – by default Console Connect will assign you a VLAN ID, however, if you would prefer you can click the switch and allocate a specific available VLAN ID.
- Class of service – select your preferred class of service.
- Contract duration – select your preferred contract duration.
- As the company ordering the connection you will be solely responsible for the connection charges.
- Once you are happy with the configuration and price of your connection click Checkout.
- To checkout, review your order details in the service summary card and then provide an:
- Order name – this is used to identify your order and will also become the name of your service.
- Optional customer reference number – use this field for adding any additional information to the order that will help track it in your own systems.
- Agree to the terms and conditions.
- Click Order.
Clouds with additional setup requirements
Some cloud providers require alternative information to configure a connection.
See the how to guides for Google Cloud, Microsoft Azure and OVHcloud below:
Port to Google Cloud connection
- Under Source click My port and select your preferred source port.
- Under Destination click Cloud and then click Google Cloud.
- You will now be asked for service key information. In order to get this, sign into your Google Cloud portal to:
- Create a partner interconnect.
- Add and pre-activate a VLAN attachment.
- Generate a pairing key.
- Head back to Console Connect to enter your pairing key.
- Select your preferred destination.
- Configure your connection:
- Connection name – this will be the name used to identify the connection in your cloud portal.
- Connection bandwidth – is limited by the capacity of the source port and cloud you have selected.
- Bandwidth tier – changing the connection bandwidth may trigger changes in the bandwidth pricing from Google Cloud. The tooltip will give you an overview of their bandwidth tiers.
- Source VLAN ID – by default Console Connect will assign you a VLAN ID, however, if you would prefer you can click the switch and allocate a specific available VLAN ID.
- Class of service – select your preferred class of service.
- Contract duration – select your preferred contract duration.
- Once you are happy with the configuration and price of your connection click Checkout.
- To checkout, review your order details in the service summary card and then provide an:
- Order name – this is used to identify your order and will also become the name of your service.
- Optional customer reference number – use this field for adding any additional information to the order that will help track it in your own systems.
- Agree to the terms and conditions.
- Click Order.
Please note, if you would like to create a redundant connection you will need to generate two pairing keys in the Google Cloud portal. These pairing keys can each be used to order two separate Layer 2 port-to-Google Cloud connections.
Port to Azure Cloud connection
- Under Source click My port and select your preferred source port.
- Under Destination click Cloud and then click Azure Cloud.
- You will now be asked for service key information. In order to get this, sign into your Azure portal to create an ExpressRoute circuit to then generate a service key. This one service key can then be used to create two separate Layer 2 port-to-Azure Cloud connections.
- You will also be asked to nominate a connection type:
- Azure private – Private bi-directional connectivity between your on-premises, virtual networks and Azure virtual networks (such as virtual machines and cloud services) via ExpressRoute.
- Azure public – Bi-directional connectivity over the internet to Microsoft public cloud services such as Microsoft 365 over ExpressRoute.
- Generate a service key.
- Head back to Console Connect to enter your pairing key.
- Select your preferred destination.
- Configure your connection:
- Connection name – this will be the name used to identify the connection in your cloud portal.
- Connection bandwidth – is limited by the capacity of the source port and cloud you have selected.
- Bandwidth tier – changing the connection bandwidth may trigger changes in the bandwidth pricing from Azure Cloud. The tooltip will give you an overview of their bandwidth tiers.
- Source VLAN ID – by default Console Connect will assign you a VLAN ID, however, if you would prefer you can click the switch and allocate a specific available VLAN ID.
- Class of service – select your preferred class of service.
- Contract duration – select your preferred contract duration.
- Once you are happy with the configuration and price of your connection click Checkout.
- To checkout, review your order details in the service summary card and then provide an:
- Order name – this is used to identify your order and will also become the name of your service.
- Optional customer reference number – use this field for adding any additional information to the order that will help track it in your own systems.
- Agree to the terms and conditions.
- Click Order.
Port to OVHcloud connection
- Under Source click My port and select your preferred source port.
- Under Destination click Cloud and then click OVHcloud.
- You will now be asked for service key information. In order to get this, sign into your OVHcloud control panel to retrieve a service key.
- Head back to Console Connect to enter your pairing key.
- Select your preferred destination.
- Configure your connection:
- Connection name – this will be the name used to identify the connection in your cloud portal.
- Connection bandwidth – is limited by the capacity of the source port and cloud you have selected.
- Bandwidth tier – changing the connection bandwidth may trigger changes in the bandwidth pricing from OVHcloud. The tooltip will give you an overview of their bandwidth tiers.
- Source VLAN ID – by default Console Connect will assign you a VLAN ID, however, if you would prefer you can click the switch and allocate a specific available VLAN ID.
- Class of service – select your preferred class of service.
- Contract duration – select your preferred contract duration.
- Once you are happy with the configuration and price of your connection click Checkout.
- To checkout, review your order details in the service summary card and then provide an:
- Order name – this is used to identify your order and will also become the name of your service.
- Optional customer reference number – use this field for adding any additional information to the order that will help track it in your own systems.
- Agree to the terms and conditions.
- Click Order.
Redundant connections
Some cloud providers may require you to provision redundant connections for them to meet their Service Level Agreements (SLAs) requirements. To meet redundancy requirements you can order a second connection and configure it to your needs.
See Google Cloud, Azure, OVHcloud for more details about creating redundant connections for clouds that use service or pairing keys.
Service keys
Service keys can be used to create direct Layer 2 connections with other companies in the Console Connect ecosystem. The A-end company is responsible for ordering the connection and all connection charges. The Z-end company is responsible for creating a service key for the A-end company to use when they place their Layer 2 connection order.
Create a service key
To create a service key:
- Select the Network menu > select Layer 2 (point-to-point) > select Create new service key.
- Configure your service key:
- Service key name – this will help you identify the service key in the future.
- Port – nominate the port at which you would like to receive this connection.
- VLAN ID – currently VLAN IDs are automatically assigned at the point the A-end company places the order for the connection.
- Connection bandwidth – set the connection bandwidth. This will be limited by the available capacity of the port you have chosen.
- Select a usage mode:
- Open allows any company in the Console Connect community to use this service key to create a connection to your nominated port.
- Restricted enables you to restrict usage to a single company which you can select from the Company name dropdown.
- Once you are satisfied with the configuration of your service key click Next.
- Review the summary of your service key and agree to the terms and conditions.
- Click Create service key.
- Securely send your service key to the A-end company who will be ordering the connection.
Manage service keys
To view or manage a service key:
- To view a list of service keys select the Network menu > select Layer 2 (point-to-point) > select Manage service keys.
- The table gives you an overview of your service keys including:
- Date created.
- Service key name.
- Port.
- VLAN ID.
- Bandwidth.
- Usage mode.
- Company.
- Status.
- The following actions can be performed on a service key:
- View key – allows you to review the key and copy it to your clipboard.
- Cancel key – a service key can be cancelled provided it has not yet been used in a connection order.
Managing Layer 2 (point-to-point) connections
How to view or manage a Layer 2 connection
- To view a list of available Layer 2 (point-to-point) connections select the Network menu > select Layer 2 (point-to-point) > select View all.
- Click on any Layer 2 service shown in the list to navigate to the service detail page.
- On the service detail page you can view:
- Service summary.
- Configuration details.
- Your account manager’s details.
- Billing summary.
- Order summary.
How to terminate a Layer 2 connection
- To terminate a Layer 2 (point-to-point) connection select the Network menu > select Layer 2 (point-to-point) > select View all.
- Click on the Layer 2 service you wish to terminate and it will navigate you to the service detail page.
- Click the Actions menu in the top right corner and then select Terminate service.
- You will be presented with details about your termination request:
- If you selected No minimum term when you ordered your service you are free to terminate at any time. You will be charged a prorated amount on your next invoice for the number of days the service was in use.
- If you selected Monthly when you ordered your service you are free to terminate at any time. As monthly services are billed in advance you will be credited a prorated amount based on the number of days left until the next billing cycle.
- If your service is under contract you will be advised of the contract end date and advised that there may be an early termination fee associated with terminating the service early.
- If your service is managed outside of Console Connect you will be prompted to contact support to submit a termination request.
Billing information
Pricing for a Layer 2 connection is based on the source, destination, bandwidth and duration of service, where costs are calculated using our pricing calculator.
Click here for more detailed information on pricing and billing.